MVC Design Pattern ve Asp.NET MVC FrameWork

MVC Nedir ?

MVC yazılım mühendisliğinde kullanılan bir design pattern’dir.Açılımı, M(Model), V(View), ve Controller(Kontrol Edici) şeklindedir.Amacı , modüler şekilde yazılım geliştirmeyi sağlamaktır. Kullanıcıya yüklü miktarda verinin sunulduğu karmaşık uygulamalarda veri ve gösterimin soyutlanması esasına dayanır.Kullanıcıyı ilgilendiren veriler, controller katmanından geçerek, sunum katmanında kullanıcıya ulaşır.Controller katmanında, veriler işlenir, bazı yanları gizlenir özetle kullanıcıya gösterilmek üzere hazırlanır.

Günümüzde MVC dendiğinde akla ilk gelen Asp.Net MVC’dir ancak Asp.NET MVC bir design pattern değildir Microsoft tarafından geliştirilen bir framework’tür.Daha hızlı, yönetilebilir ve yenilenebilir yazılım geliştirmeyi amaçlar.Bu framework içinde MVC’yi tekrar açıklamak istersek:

MODEL: verinin ve iş mantığının şeklini temsil eder. Uygulamanın verilerini tutar. Model nesneleri, model durumunu bir veritabanından alır ve depolar.

VIEW: Gösterilmek istenen verileri, kullanıcıya model kullanarak gösterir ve aynı zamanda verinin değişimine olanak sağlar.

CONTROLLER: Kullanıcı istekleri için diğer bileşenler arasındaki etkileşimi sağlar.Genellikle, kullanıcı, uygun URL isteğini view ile iletir ve bu istek o view’den sorumlu controller tarafından ele alınır.Controller, uygun bir view model ile etkileşime geçer ve model’den aldığı veriyi yanıt olarak verir.

mvc-architecture

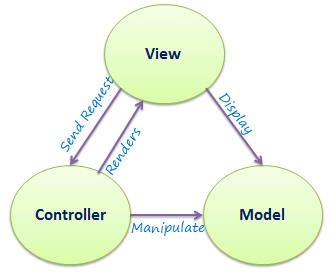
MVC Mimarisi Yapısı Genel Gösterim

Asp.Net MVC framework kullanarak, e-ticaret temalı projemize başlayalım.İlk yapmamız gereken Visual Studio’nun herhangi bir sürümü üzerinde Web temalı proje açmak.Ben Visual studio2015 Community sürümünü kullanıyor olacağım. Bunun için sırasıyla şu adımları uygulayalaım

  • Visual studio start ekranı-> Yeni Proje Aç
  • New project ekranında, Installed sekmesi->Other Project Types->Blank Solution (Şekil 1)
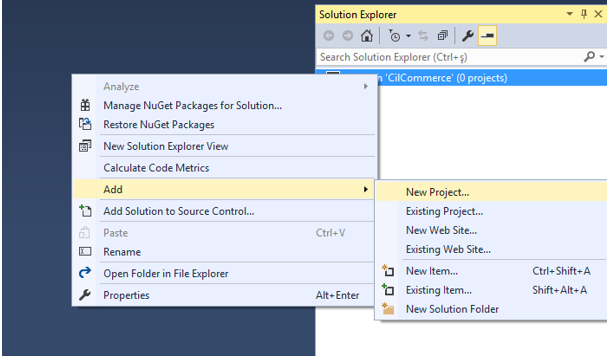
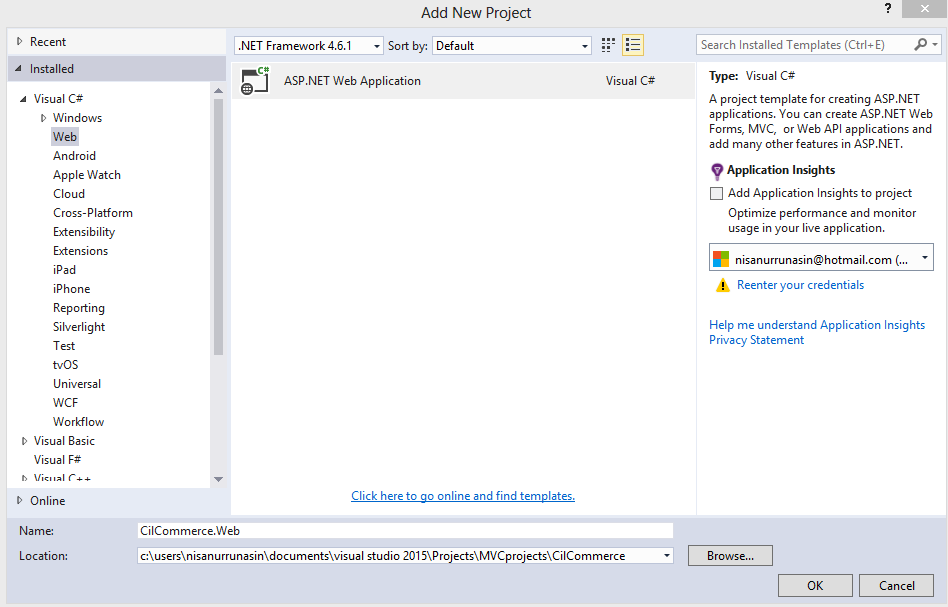
  • Blank Solution üzerine sağ tıklayıp add->new project->installed->web->Asp.NET Web Application seçilir ve şekilde anlatıldığı gibi isimlendirme yapılır.(Şekil 2 ve Şekil 3)

Ekran Alıntısı23.PNG

Şekil 1

Ekran Alıntısı7.PNG

Şekil 2

ekran-alintisiŞekil 3

İlk 3 adımın yapılmasının ardından solution explorer’da framework için gereken klasörler ve dosyalar şekilde 4’teki gibi bize sunulur.Şimdi bu klasör ve dosyaların bize hazır olarak sunulmasındaki amaçları açıklayalım.

ekran-alintisi5

Şekil 4

App_Data:Projemizde kullanacağımız veri dosyalarını barındırır.Bu veri dosyalarına örnek verecek olursak, xml, mdf, LocalDB dosyalarını söyleyebiliriz.

App_Start:Her yazılımın bir yaşam döngüsü vardır ve geliştirecek olduğumuz yazılım projesi çalışmaya başladığı anda çalışmasını istediğimiz kodlar yani daha derli toplu haliyle sınıflar bu klasörde bulunur.Örnek olarak AuthConfig.cs, BundleConfig.cs, FilterConfig.cs, RouteConfig.cs  gibi yapılandırma dosyalarını söyleyebiliriz.

Controller: Controller klasörü, controller için sınıf dosyalarını içerir. MVC, controller dosyla isimlerinin controller kelimesi ile sonlanmasını gerektirir.

Models:Model klasörüde isminden anlaşılacağı gibi model sınıflarını içerir.Bu sınıflar, geliştirecek olduğumuz yazılım için gereken veriyi barındırır, işler ve kullanıcıya iletir.

Views: Uygulama için gereken html dosyalarını içerir. Tipik olarak view dosyası, html ve C # veya VB.NET kodunu yazdığınız bir .cshtml dosyasıdır.Views klasörü, her controlleriçin ayrı bir klasör içerir. Örneğin, HomeController tarafından işlenecek olan tüm .cshtml dosyaları Views> Home klasöründe bulunur.Views klasörü altındaki shared klasörü, farklı controller’lar arasında paylaşılacak olan tüm view’leri içerir örneğin layout dosyları.

Global.asax:Global.asax, Application_BeginRequest, application_start, application_error, session_start, session_end gibi uygulama düzeyindeki olaylara yanıt olarak kod yazmamızı sağlar.

Packages.config:Packages.config dosyası, uygulamaya hangi paketleri ve sürümleri yüklediğinizi takip etmek için NuGet tarafından yönetilir.

Web.config:Web.config dosyası, uygulamamızın ayarlarını içerir.Örnek verecek olursak bir veritabanı bağlantısı sağladığımızda, kullanılacak olan veritabanına dair iletişim bilgileri, kısıtlamalar ya da izinler burada bulunur.

Genel bilgilerimizi verdikten sonra, projemiz için ilk gerçel adımı atalım ve Views klasörü altına Shared isimli bir klasör açalım ve bu klasör içerisine şekile 5’te gösterildiği gibi bir tane MVC5 layout Page dosyasını _Root ismiyle ekleriz ekleyelim.
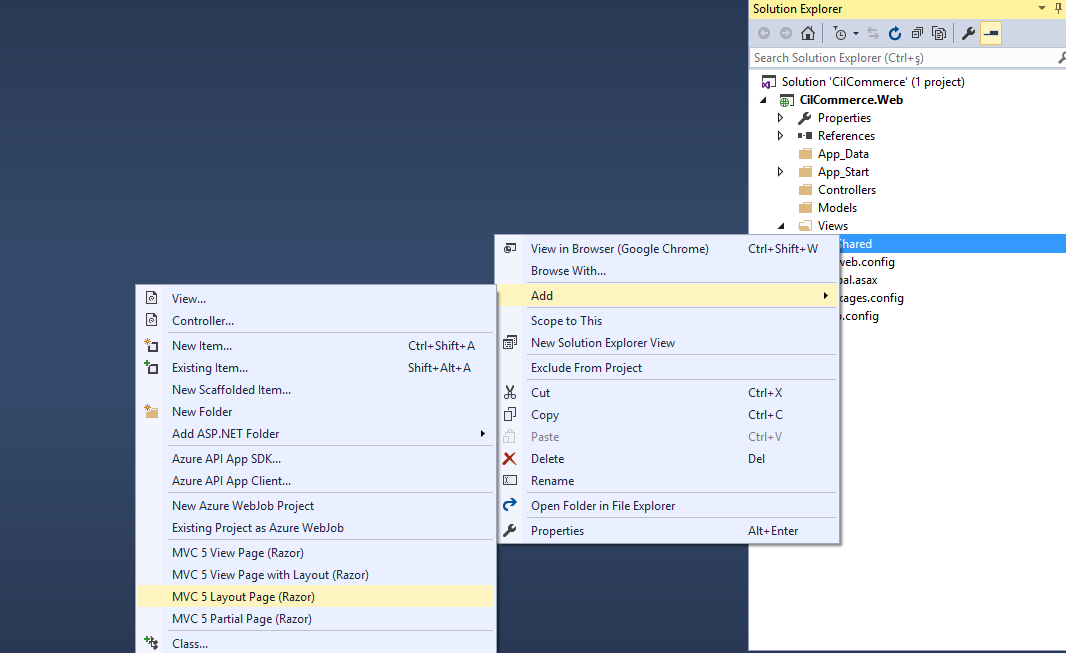
adsiz1

Şekil 5

            Layout’ı sayfamıza ekledikten sonra Razor deyişinden ve ve Layout terimlerinden bahsedelim.Razor bir görüntüleme motorudur ve MVC 3 ile işleve girmiştir.Server tarafında çalışacak olan kodlarımın ayrımını @ karakteri ile yapmamıza olanak sağlar.Server ve client side kodların ayrımını yaptığımız içinse yazılımımız hız kazanır.Peki, tek satır değilde beş on satır kodu serve tarafında çalıştırmak istesek ne yapacaktık, o zamanda yardıma {} yani süslü parantezler koşar, @{} belirteciyle,kodlarımızı süslü parantezler arasına yazarız.Razor view engine bize html içerisine, ihtiyaç duyduğumuzda server side kod yazmamıza olanak verir.Razor view dosyaları .cshtml ya da vbhtml uzantılıdır.

Oluşturduğumuz _root.cshtml dosyasının genel görünümü  şekil 6’daki gibi olur.
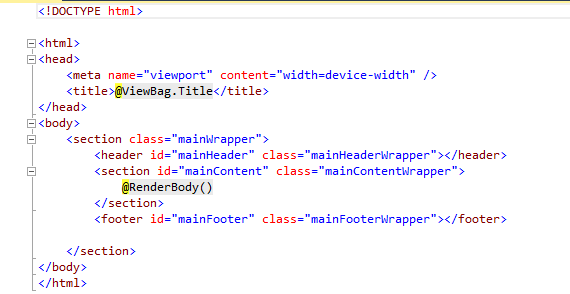
ekran-alintisi78

Şekil 6

            Oluşan layout sayfası html kodlarından ve razor bildirimlerinden oluşuyor.buradaki @ViewBag ve @ RenderBody kod’larının ne ifade ettiklerini açıklayalım.ViewBagController’dan  view’e geçici verileri (modelde bulunmayan) aktarmak istediğinizde kullanılır.

Gelelim @RenderBody komutuna, contentViewHolder ile hemen hemen aynı işi yapar diyebiliriz.layoutPage olarak seçilen sayfaya view yükler.

Elementlerimizi, HTML5 ile geliştiriyoruz , dosyamızaki meta etiketi, sayfamızın responsive olmasını sağlamak için kullanılır.

Sıra geldi projemizin temel anlamda veritabanı bağlantısını sağlamaya.Bunun için veritabanı tasarımını yapmaya başlicaz.MSSQL management studio ortamında cilcommercev1 isimli bir veritabanı oluştururuz ve bunun ardından veritabanına sırasıyla, ihtiyaç duyduğumuz sayfaları ekleyeceğiz çünkü MVC yapısına uygun olarak projemizi modül modül geliştireceğiz.

Projemize başlangıç olarak Category tablosunu ekleriz.bu tabloda, ürünlerin kategorileri ağaç şeklinde bulunmaktadır.Bu ağaç gösterimi şekil 7’de görebilirsiniz.Tabloyu oluşturmak için kullanılan script kodlarını paylaşalım.

CREATE TABLE [dbo].[Category](

[id] [int] IDENTITY(1,1) NOT NULL,

[ParentId] [int] NULL,

[Name] [nvarchar](60) NULL,

[PictureId] [int] NULL CONSTRAINT [DF_Category_PictureId]  DEFAULT ((0)),

[DisplayOrder] [int] NULL CONSTRAINT [DF_Category_DisplayOrder]  DEFAULT ((1000)),

[isActive] [bit] NULL CONSTRAINT [DF_Category_isActive]  DEFAULT ((1)),

CONSTRAINT [PK_Category] PRIMARY KEY CLUSTERED

(   [id] ASC )WITH (PAD_INDEX = OFF, STATISTICS_NORECOMPUTE = OFF, IGNORE_DUP_KEY = OFF, ALLOW_ROW_LOCKS = ON, ALLOW_PAGE_LOCKS = ON) ON [PRIMARY]) ON [PRIMARY]


ekran-alintisi9

Şekil 7


İlk dersimizde genel anlamda MVC nedir, Asp.NET MVC Framework nedir sorularının cevabı verildi.Asp.Net FrameWork ile bir proje visual studio ortamında nasıl oluşturulurun cevabını verdik.Projemiz için gereken ilk sayfayı ekledik ve sayfamız üzerinde gelen genel geçer bildirimlerin neler olduğundan ve tanımlarından, layout ve razor kavramından bahsettik.Projemizin Category sayfasının veritabanı kısmını oluşturmaya başladık.


Bir sonraki derste görüşmek üzere…


Hazırlayan: Nisanur bulut


Kaynakça :

http://www.tutorialsteacher.com/mvc/asp.net-mvc-tutorials

https://en.wikipedia.org/wiki/ASP.NET_MVC

Javascript ile Bir fotoğrafı kendi kendine büyütüp küçültelim :)

<!DOCTYPE html>
<html lang="en">
<head>o
    <meta charset="UTF-8">
    <title>ResimleSlayt</title>
    
var time;
      var myimage=document.images;
        function bigPicture()
        {
            myimage[0].height+=20;
            myimage[0].width+=20;
            if(myimage[0].height==600 && myimage[0].width==600)
            {
                window.clearInterval(time);
                smallPictureStart();
            }}
            function bigPictureStart()
      {
          time=setInterval(bigPicture,1000);
      }
function smallPictureStart()
{
    mytime=setInterval(smallPicture,1000);
}
function smallPicture() {
    myimage[0].height -= 20;
    myimage[0].width -= 20;
    if(myimage[0].height==400 && myimage[0].width==400)
    {
        window.clearInterval(mytime);
        bigPictureStart();
    }}

    
</head>
<body onload="bigPictureStart()">
<center><img id="myPic1" src="myimage1.jpg" height="500" width="500"/></center>

</body>
</html>

Fotoğrafımız site açılır açılmaz büyümeye başlıyor cunku body etiketi içinde bigPictureStart fonksıyonu cagrılıyor.Fotografımızın height ve width özellikleri 600 oldugunda buyume duruyor ve 400 olana dek kuculuyor.


JavaScript Örnek 2

4 basamakli bir sayi alalim ve önce 4 basamakli mi diye kontrol edelim ardından bu sayimizi ters çevrilmiş şekilde kullancıya gösterelim 🙂 Örneğimizde fonksiyon ve dizi yapılarını kullandım 🙂


        var number= 0,basamak= 1,mynumber=0;
     function myfunction()
     {
         var basamak=1;

         number=prompt("4 basamakli bir sayi giriniz : ");

mynumber=number;
         while(number>=10) {

             number = (number / 10);

             basamak++;
         }
             if (basamak != 4) {

                 alert(" " + basamak + " basamakli bir sayi girdiniz");


             }
         else
             alert("4 basamakli bir sayi girdiginiz icin tesekkurler :) ");

         return basamak;
     }


function yourfunction()
{
    var yazilacak_rakam=0;
    var dizi=new Array();
    while( mynumber>=10 ) {
        //Sayının son rakamı alınıp
        //ekrana bastırılıyor.
        yazilacak_rakam = Math.round(mynumber % 10);
       dizi.push(yazilacak_rakam);

        //Son rakam ekrana bastırıldığı
        //için sayının son hanesi atılıyor.
     mynumber /= 10;

    }
    dizi.push(Math.round(mynumber));
    for(var i=0; i

JavaScript Yeni Uğraşım :)

JavaScript in Java diline nesne yönelimli olması sebebiyle benzer olduğunu ama birebir alakalı şeyler olduğunu düşünüyorsanız yanılıyorsunuz 🙂

JavaScript dili html kodlarının <head></head> etiketleri arasına yazılır ve etiketleri arasına kodları yazılır 🙂

Benim için en buyuk sorun yazılan kodların konsol çıktılarını görememek oldu ama bunu çaresini de Firebug(Firefox ‘un fireBug eklentisi) eklentisinde buldum.

Başlangıç için küçük  iki örnekle başlayalım 🙂

  • Bir öğrenci için kullanıcıdan öğrenci numarası, isim, arasınav (30%), final (40%), proje (20%), ve katılım (10%) notlarını girmesini isteyelim (prompt komutu ile).
  • Daha sonra girilen notları yüzdeliklerine göre hesaplayıp konsolumuzda sonuçları görelim.Ekran Alıntısı
  • Kullanıcıdan örnek bir sayı girmesini isteyiniz, daha sonra 1-5 arası bir sayı girmesini isteyiniz.
  • Girilen birinci sayıyı, seçilen ikinci sayı kadar kendisiyle çarpıp sonucu ekrana yazdırın.
  • Örneğin:

birinci sayı 8, seçilen ikinci sayı 3

1Ekran Alıntısı

example of functons of math.h

#include <stdio.h>
#include <stdlib.h>
#include <math.h>
#define pi 3.141592
int main(){
double A=0;
double B=0;
double A_sum=0;
double B_sum=0;
int i=1;
double sum=0;
double value=0;
double value1=0;
double sum1=0;
double D_sum=0;
double D=0;
for(i=1; i<=25; i++){
value=pow((double)2,(double)i);
sum=sum+value;
}
printf(“the result of sum = %f dir \n\n\n”,sum);
for(i=1; i<=25; i++){
value1=1/(pow((double)2,(double)i));
sum1=sum1+value1;
}
printf(“result of serie= %f dir \n\n”,sum1);
for(i=1; i<=5; i++){
printf(“cos(%dpi)=%f\n\n”,i,cos(i*pi));
}
for(i=1; i<=5; i++){
printf(“sin(%dpi)=%f\n\n”,i,sin(i*pi));
for(i=1; i<=5; i++){
printf(“log %d = %f dir\n\n”,i,log((double)i));}
for(i=1; i<=5; i++){
printf(“e ‘s %d. exponent = %f\n\n”,i,exp((double)i));}
for(i=1; i<=25; i++){
if(i%2==1){
A=1/(pow((double)i,(double)2));
A_sum+=A;}
else{
B=1/(pow((double)i,(double)2));
B_sum+=B;}
}
printf(“%f = A\t\t %f = B\n\n”,A_sum,B_sum);
printf(“value of A-B = %f\n\n”,A-B);
for(i=1; i<=25; i++){
D=(double)i/(double)(i+1);
D_sum+=D;
i++;}
printf(“%f = sum of D\n\n”,D_sum);
system(“pause”);
return(0);}
the result of sum = 67108862.000000 dir

result of serie= 1.000000 dir

cos(1pi)=-1.000000

cos(2pi)=1.000000

cos(3pi)=-1.000000

cos(4pi)=1.000000

cos(5pi)=-1.000000

sin(1pi)=0.000001

sin(2pi)=-0.000001

sin(3pi)=0.000002

sin(4pi)=-0.000003

sin(5pi)=0.000003

log 1 = 0.000000 dir

log 2 = 0.693147 dir

log 3 = 1.098612 dir

log 4 = 1.386294 dir

log 5 = 1.609438 dir

e ‘s 1. exponent = 2.718282

e ‘s 2. exponent = 7.389056

e ‘s 3. exponent = 20.085537

e ‘s 4. exponent = 54.598150

e ‘s 5. exponent = 148.413159

1.214479 = A 0.391244 = B

value of A-B = -0.000136

11.409933 = sum of D

Press any key to continue . . .

summory of for loop’s shapes

#include <stdio.h>
#include <stdlib.h>
int main(){
int i,j,k;

for(i=5; i>=1; i–){
for(k=i-1; k>=1; k–)
printf(” “);
for(j=i; j<=5; j++){
printf(“%d”,j);}
printf(“\n”);}
for(i=1; i<=5; i++){
for(j=1; j<=i; j++){
printf(“%d”,j);}
printf(“\n”);}

for(i=5; i>=1; i–){
for(j=1; j<=i; j++){
printf(“%d”,j);}
printf(“\n”);}

for(i=5; i>=1; i–){
for(k=i; k<5; k++){
printf(” “);}
for(j=1; j<=i; j++){
printf(“%d”,j);}
printf(“\n”);}

system(“pause”);
return(0);}


result of pragram=

5
45
345
2345
12345
1
12
123
1234
12345
12345
1234
123
12
1
12345
1234
123
12
1
Press any key to continue . . .


more information about keyboard .

Keyboard Shortcuts (Microsoft Windows)
1. CTRL+C (Copy)
2. CTRL+X (Cut)
…… 3. CTRL+V (Paste)
4. CTRL+Z (Undo)
5. DELETE (Delete)
6. SHIFT+DELETE (Delete the selected item permanently without placing the item in the Recycle Bin)
7. CTRL while dragging an item (Copy the selected item)
8. CTRL+SHIFT while dragging an item (Create a shortcut to the selected item)
9. F2 key (Rename the selected item)
10. CTRL+RIGHT ARROW (Move the insertion point to the beginning of the next word)
11. CTRL+LEFT ARROW (Move the insertion point to the beginning of the previous word)
12. CTRL+DOWN ARROW (Move the insertion point to the beginning of the next paragraph)
13. CTRL+UP ARROW (Move the insertion point to the beginning of the previous paragraph)
14. CTRL+SHIFT with any of the arrow keys (Highlight a block of text)
SHIFT with any of the arrow keys (Select more than one item in a window or on the desktop, or select text in a document)
15. CTRL+A (Select all)
16. F3 key (Search for a file or a folder)
17. ALT+ENTER (View the properties for the selected item)
18. ALT+F4 (Close the active item, or quit the active program)
19. ALT+ENTER (Display the properties of the selected object)
20. ALT+SPACEBAR (Open the shortcut menu for the active window)
21. CTRL+F4 (Close the active document in programs that enable you to have multiple documents opensimultaneou sly)
22. ALT+TAB (Switch between the open items)
23. ALT+ESC (Cycle through items in the order that they had been opened)
24. F6 key (Cycle through the screen elements in a window or on the desktop)
25. F4 key (Display the Address bar list in My Computer or Windows Explorer)
26. SHIFT+F10 (Display the shortcut menu for the selected item)
27. ALT+SPACEBAR (Display the System menu for the active window)
28. CTRL+ESC (Display the Start menu)
29. ALT+Underlined letter in a menu name (Display the corresponding menu) Underlined letter in a command name on an open menu (Perform the corresponding command)
30. F10 key (Activate the menu bar in the active program)
31. RIGHT ARROW (Open the next menu to the right, or open a submenu)
32. LEFT ARROW (Open the next menu to the left, or close a submenu)
33. F5 key (Update the active window)
34. BACKSPACE (View the folder onelevel up in My Computer or Windows Explorer)
35. ESC (Cancel the current task)
36. SHIFT when you insert a CD-ROMinto the CD-ROM drive (Prevent the CD-ROM from automatically playing)
Dialog Box – Keyboard Shortcuts
1. CTRL+TAB (Move forward through the tabs)
2. CTRL+SHIFT+TAB (Move backward through the tabs)
3. TAB (Move forward through the options)
4. SHIFT+TAB (Move backward through the options)
5. ALT+Underlined letter (Perform the corresponding command or select the corresponding option)
6. ENTER (Perform the command for the active option or button)
7. SPACEBAR (Select or clear the check box if the active option is a check box)
8. Arrow keys (Select a button if the active option is a group of option buttons)
9. F1 key (Display Help)
10. F4 key (Display the items in the active list)
11. BACKSPACE (Open a folder one level up if a folder is selected in the Save As or Open dialog box)

Microsoft Natural Keyboard Shortcuts
1. Windows Logo (Display or hide the Start menu)
2. Windows Logo+BREAK (Display the System Properties dialog box)
3. Windows Logo+D (Display the desktop)
4. Windows Logo+M (Minimize all of the windows)
5. Windows Logo+SHIFT+M (Restorethe minimized windows)
6. Windows Logo+E (Open My Computer)
7. Windows Logo+F (Search for a file or a folder)
8. CTRL+Windows Logo+F (Search for computers)
9. Windows Logo+F1 (Display Windows Help)
10. Windows Logo+ L (Lock the keyboard)
11. Windows Logo+R (Open the Run dialog box)
12. Windows Logo+U (Open Utility Manager)
13. Accessibility Keyboard Shortcuts
14. Right SHIFT for eight seconds (Switch FilterKeys either on or off)
15. Left ALT+left SHIFT+PRINT SCREEN (Switch High Contrast either on or off)
16. Left ALT+left SHIFT+NUM LOCK (Switch the MouseKeys either on or off)
17. SHIFT five times (Switch the StickyKeys either on or off)
18. NUM LOCK for five seconds (Switch the ToggleKeys either on or off)
19. Windows Logo +U (Open Utility Manager)
20. Windows Explorer Keyboard Shortcuts
21. END (Display the bottom of the active window)
22. HOME (Display the top of the active window)
23. NUM LOCK+Asterisk sign (*) (Display all of the subfolders that are under the selected folder)
24. NUM LOCK+Plus sign (+) (Display the contents of the selected folder)
25. NUM LOCK+Minus sign (-) (Collapse the selected folder)
26. LEFT ARROW (Collapse the current selection if it is expanded, or select the parent folder)
27. RIGHT ARROW (Display the current selection if it is collapsed, or select the first subfolder)
Shortcut Keys for Character Map
After you double-click a character on the grid of characters, you can move through the grid by using the keyboard shortcuts:
1. RIGHT ARROW (Move to the rightor to the beginning of the next line)
2. LEFT ARROW (Move to the left orto the end of the previous line)
3. UP ARROW (Move up one row)
4. DOWN ARROW (Move down one row)
5. PAGE UP (Move up one screen at a time)
6. PAGE DOWN (Move down one screen at a time)
7. HOME (Move to the beginning of the line)
8. END (Move to the end of the line)
9. CTRL+HOME (Move to the first character)
10. CTRL+END (Move to the last character)
11. SPACEBAR (Switch between Enlarged and Normal mode when a character is selected)
Microsoft Management Console (MMC)
Main Window Keyboard Shortcuts
1. CTRL+O (Open a saved console)
2. CTRL+N (Open a new console)
3. CTRL+S (Save the open console)
4. CTRL+M (Add or remove a console item)
5. CTRL+W (Open a new window)
6. F5 key (Update the content of all console windows)
7. ALT+SPACEBAR (Display the MMC window menu)
8. ALT+F4 (Close the console)
9. ALT+A (Display the Action menu)
10. ALT+V (Display the View menu)
11. ALT+F (Display the File menu)
12. ALT+O (Display the Favorites menu)

MMC Console Window Keyboard Shortcuts
1. CTRL+P (Print the current page or active pane)
2. ALT+Minus sign (-) (Display the window menu for the active console window)
3. SHIFT+F10 (Display the Action shortcut menu for the selected item)
4. F1 key (Open the Help topic, if any, for the selected item)
5. F5 key (Update the content of all console windows)
6. CTRL+F10 (Maximize the active console window)
7. CTRL+F5 (Restore the active console window)
8. ALT+ENTER (Display the Properties dialog box, if any, for theselected item)
9. F2 key (Rename the selected item)
10. CTRL+F4 (Close the active console window. When a console has only one console window, this shortcut closes the console)
Remote Desktop Connection Navigation
1. CTRL+ALT+END (Open the Microsoft Windows NT Security dialog box)
2. ALT+PAGE UP (Switch between programs from left to right)
3. ALT+PAGE DOWN (Switch between programs from right to left)
4. ALT+INSERT (Cycle through the programs in most recently used order)
5. ALT+HOME (Display the Start menu)
6. CTRL+ALT+BREAK (Switch the client computer between a window and a full screen)
7. ALT+DELETE (Display the Windows menu)
8. CTRL+ALT+Minus sign (-) (Place a snapshot of the active window in the client on the Terminal server clipboard and provide the same functionality as pressing PRINT SCREEN on a local computer.)
9. CTRL+ALT+Plus sign (+) (Place asnapshot of the entire client window area on the Terminal server clipboardand provide the same functionality aspressing ALT+PRINT SCREEN on a local computer.)

Microsoft Internet Explorer Keyboard Shortcuts
1. CTRL+B (Open the Organize Favorites dialog box)
2. CTRL+E (Open the Search bar)
3. CTRL+F (Start the Find utility)
4. CTRL+H (Open the History bar)
5. CTRL+I (Open the Favorites bar)
6. CTRL+L (Open the Open dialog box)
7. CTRL+N (Start another instance of the browser with the same Web address)
8. CTRL+O (Open the Open dialog box,the same as CTRL+L)
9. CTRL+P (Open the Print dialog box)
10. CTRL+R (Update the current Web )Görsel